

What if the wobble isn’t coming from the table at all, but from the floor beneath it? Before reaching for a tool, find out where the movement starts. Knowing how to adjust a wobbly handmade table begins with checking whether the cause is uneven floor contact, a loose fixing or movement in the frame.
It’s understandable to worry that tightening the wrong part could strain a joint or damage the wood. Start with the table empty, move it carefully to another hard, flat-looking spot, and note which foot lifts. Then inspect accessible screws or bolts without forcing them. These simple checks can help you avoid guesswork.
This guide explains how to identify likely causes, choose a proportionate adjustment and retest the table. You’ll learn when a removable shim or gentle tightening may help, and when to stop rather than dismantle a joint or keep using an unstable table. The aim is to avoid unnecessary work and protect the table.
Key Takeaways
- Check whether the floor or the table is causing the movement before adjusting anything.
- Inspect the feet, accessible fixings and frame with the table empty, changing one thing at a time.
- Make small, low-risk adjustments and retest the table in the same way each time.
- Match the response to the symptom: floor-contact issues and loose fixings need different approaches.
- Stop if a joint appears damaged or the table remains unstable.
Why a Handmade Table Wobbles: Start by Separating the Floor from the Table
A wobble can have several causes, and it doesn’t automatically mean your handmade table is damaged. The table may be sound while one foot sits over an uneven patch of floor. Or the movement may come from a fixing or joint in the frame. Before deciding how to adjust a wobbly handmade table, observe what moves and when. Tightening, shimming or dismantling too soon can turn a simple diagnosis into an unnecessary repair.
A table may rock diagonally, sway from side to side or shift where the tabletop meets the base. These movements offer clues, but they aren’t a diagnosis on their own. Legs, aprons and stretchers all contribute to a table’s support, as outlined in this general overview of table construction. The first task is to work out whether movement begins at the floor or within the table.
What does a wobbly table actually tell you?
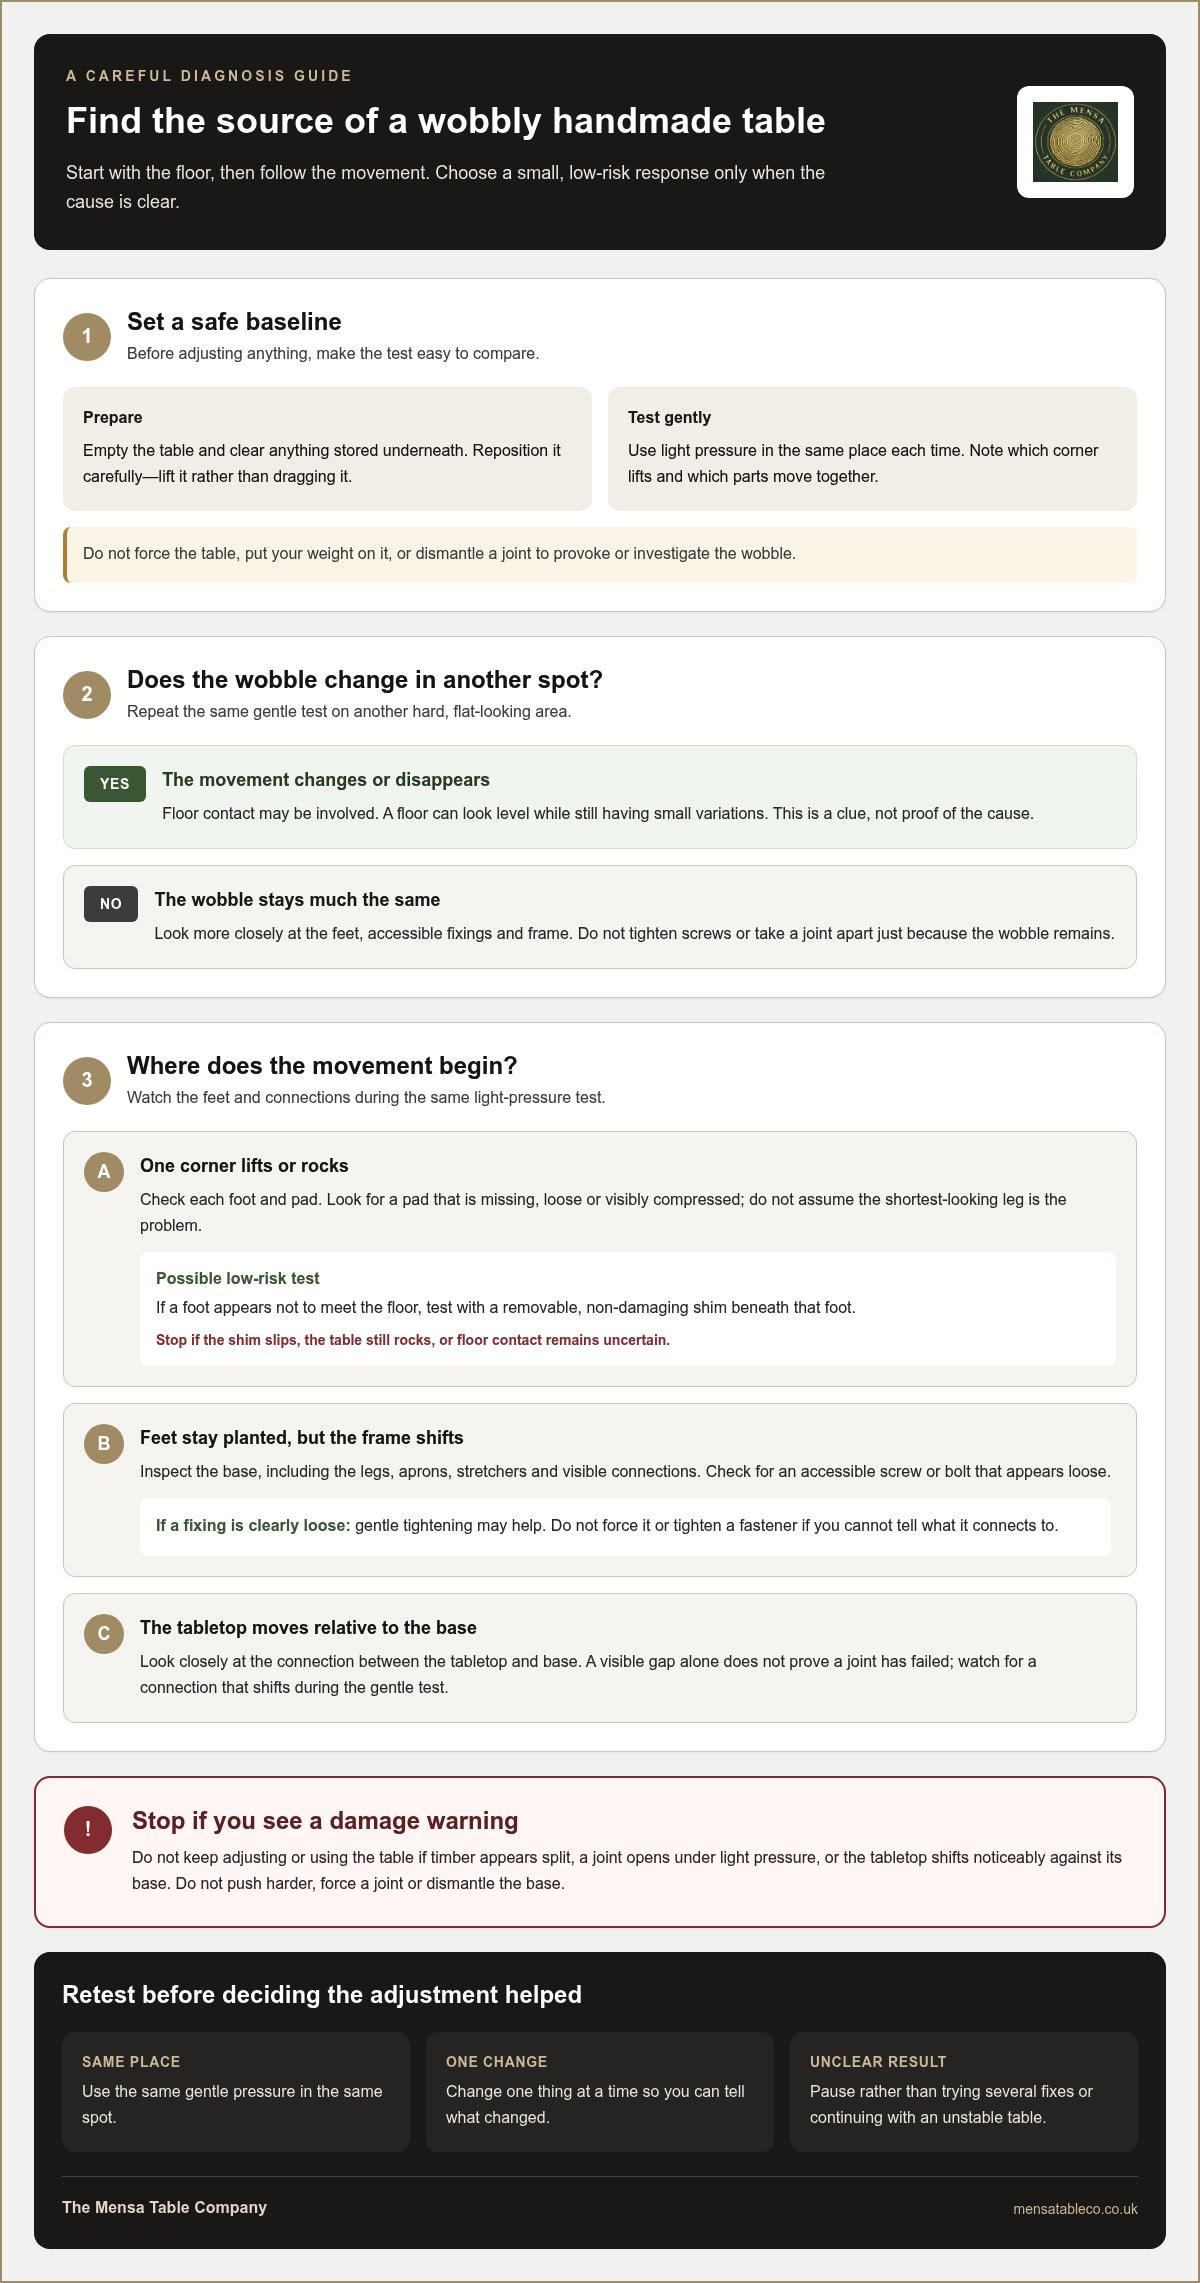
Notice the pattern. If the table rocks when you press gently on a corner, one or more feet may not be making firm contact with the floor. If the feet stay planted but the frame shifts under a light sideways push, inspect the base. If the tabletop moves independently of the legs or apron, look closely at the connection between the top and base.
Clear the surface and use gentle pressure only. Note which corner or side responds, whether the movement happens when you lightly touch the edge, and which parts seem to move together. These observations give you a baseline for checking whether an adjustment helped. Don’t force the table or put your weight on it to provoke a wobble.
Is the table or the floor causing the wobble?
Try the same gentle test in another hard, flat-looking spot. Lift and reposition the empty table carefully rather than dragging it, then check whether it rocks or sways in the same way. If the movement changes or disappears, floor contact may be involved. If the wobble remains much the same, inspect the table’s feet, fixings and frame more closely.
This comparison offers a clue, not proof. Floors that look level can still have small variations, and changing the table’s position may alter how its feet meet the surface. Keep the test consistent: apply the same gentle pressure in the same place and note whether the pattern changes. Don’t tighten screws or take a joint apart yet. Careful observation gives you a better starting point for the checks that follow.
How to Diagnose a Handmade Table’s Floor, Feet, Fixings, and Frame
A useful inspection identifies where movement begins. Empty the table, remove anything stored underneath it, and make sure you can see the feet and underside safely. Use a torch if the light is poor. No specialist tools are needed for this initial check. Change one thing at a time, then repeat the same gentle test so you can tell what has changed.
Don’t assume that the material or appearance of a handmade table explains the wobble. Solid wood can respond to changes in its surroundings, but a visible gap or slight variation alone doesn’t prove that a joint has failed. Check the actual floor contact, fixings and frame. Don’t put your weight on the tabletop, force a joint or start taking the base apart during this first inspection.
Check floor contact, feet, and pads first
Look at each foot in turn. Check for a missing, loose or visibly compressed pad, and notice whether one corner lifts when you press gently on the opposite corners. Repeat the test in the same order so your observations are easy to compare. If the pattern changes when you reposition the table, that’s useful information, but it doesn’t identify a fault by itself.
Don’t assume the shortest-looking leg is the problem. The floor may dip beneath another foot, causing a sound table to rock. A change in position can alter floor contact, while a damaged or uneven pad may affect just one foot. Record what you can see and feel before considering an adjustment.
Inspect fixings, joints, and the tabletop connection
Once you’ve checked the feet, look underneath for accessible screws or bolts that appear loose. Also look for gaps, cracks or signs of movement where the legs, frame and tabletop meet. Keep the table steady and apply only light pressure to the top or frame. Watch the connections: does the whole base move together, or does one joint shift relative to the adjoining piece?
A visible gap can be a clue, but it doesn’t prove structural failure. Natural grain, a shadow or the shape of a handmade joint may look uneven without being loose. Focus on changes during the gentle test: a gap that opens, a fastener that visibly shifts, or a crack that moves deserves caution. Don’t push harder to make the movement clearer.
Stop the inspection if timber appears split, a joint opens under light pressure, or the tabletop shifts noticeably against its base. Don’t tighten a fastener if you can’t tell what it connects to, and don’t dismantle a handmade joint to investigate. At this stage, gather clues rather than committing to a repair. Your observations will help you choose a proportionate next step when deciding how to adjust a wobbly handmade table.
Which Wobble Fix Is Appropriate? Match the Adjustment to the Cause
The right response depends on where the movement starts. A foot that doesn’t meet the floor calls for a different approach from a visibly loose bolt. Neither is the same as a joint shifting in the timber. Use what you’ve observed to choose the smallest reasonable test. If you can’t identify the source with confidence, pause instead of trying several fixes at once.
| Observed symptom | Likely area | Low-risk response | Stop point |
|---|---|---|---|
| One corner rocks, especially in a different position | Floor contact or foot pad | Test with a removable, non-damaging shim beneath the foot that appears not to meet the floor | The shim slips, the table still rocks, or contact remains uncertain |
| A foot pad is missing or visibly compressed | Contact point beneath that leg | Check whether the pad is designed to sit securely and replace or reposition it only if straightforward | The foot itself appears damaged or the table remains unstable |
| An accessible screw or bolt visibly shifts | Loose fastener | Gently tighten that fastener with a suitable tool, stopping as soon as it is secure | It turns without tightening, resists, or the surrounding timber moves |
| A joint opens, timber is cracked, or movement returns | Joint or frame | Stop using the table and avoid DIY structural work | Stop immediately if light pressure increases the movement |
When a floor-contact adjustment may be enough
A thin, removable shim can help test whether a particular foot is short of firm floor contact. Place it beneath the suspected foot, then repeat the gentle stability check. See whether the rocking changes and check that the shim stays in place. Treat this as a test, not a permanent fix. Don’t stack loose scraps or use anything that can slide out.
If the wobble improves, that supports the floor-contact explanation, but it doesn’t prove the table will remain stable after being moved or used. Recheck the same corners and make sure the shim hasn’t shifted. If it feels insecure, remove it rather than building up layers.
When tightening or structural work is not a simple adjustment
Only consider tightening a fastener that’s accessible and clearly loose. Turn it gently, stopping once it feels secure. Overtightening can damage threads or fixings, or put pressure on the surrounding timber. A loose bolt may need only a modest adjustment. A visible split or a joint that opens is a different concern, not a reason to add glue, drill new holes or dismantle the frame.
Cracked wood, recurring movement or a joint that shifts under light pressure are reasons to stop and assess the table rather than keep experimenting. That distinction is central to how to adjust a wobbly handmade table safely: address a simple contact issue with care, but don’t treat structural warning signs as routine tightening.
How to Adjust a Wobbly Handmade Table Safely, Step by Step
Once you have a likely cause, keep the response measured. Don’t make several changes until the table feels better. Try one small adjustment, then check whether it made a difference. This sequence helps you avoid putting unnecessary pressure on handmade joints and surrounding timber.
- Empty the table. Remove crockery, books and anything stored underneath so the feet and frame are easier to see.
- Check its placement. Set the table on the surface where you want to assess it. Lift it rather than dragging it, which could disturb the feet or mark the floor.
- Inspect the contact points. Look at each foot and pad for a gap, missing piece or visible compression. If the cause appears to be floor contact, try a stable, removable shim under the foot that doesn’t sit firmly.
- Choose one adjustment only. If an accessible fixing is clearly loose, use a suitable hand tool to tighten it gently. Don’t adjust a fastener if you can’t identify what it connects or reach it without forcing the frame.
- Retest the same way. Apply gentle pressure at the original wobble point and check all feet again. Compare the result with how the table moved before. If it’s still unstable, don’t add another adjustment without reassessing the cause.
Make a small adjustment and retest
A shim is a test of floor contact, not a reason to build up a stack beneath a leg. It should sit flat and remain in place under gentle pressure. Remove it if it slips or makes the table feel less secure. For a loose fixing, turn the tool only until the fastener feels secure. Stop there. More force may harm the fitting or timber without improving stability.
Keep the test consistent: use the same gentle pressure at the same point after each change. That helps you tell whether the adjustment worked, made no difference or introduced new movement. It’s a safer approach to how to adjust a wobbly handmade table than changing feet, fixings and joints all at once.
Know when to stop the adjustment
Stop immediately if a fixing turns without tightening, timber cracks or a joint visibly shifts. Don’t use the table if its base still feels unstable under light, ordinary pressure. Avoid glue, drilling new holes or dismantling the frame as quick fixes. These steps can alter a joint or make later assessment harder, especially when the source of movement isn’t clear.
If the table remains unstable, leave further adjustment alone rather than risking damage. If you’re considering a new made-to-order dining table instead, get in touch to discuss your requirements.
Prevent Repeat Wobbling and Choose a Thoughtful Next Step
A table’s position can change how its feet meet the floor. After moving it, turning it or rearranging the room, check that it sits evenly before putting it back into regular use. This quick check may reveal a changed contact point before you reach for tools or make an adjustment the table doesn’t need.
Reduce the chance of wobbling returning
Check floor contact whenever you move the table, even a short distance. A floor that looks level may still have slight variations, and a foot pad can shift or compress over time. Use gentle pressure rather than leaning heavily on the edge. Pushing down hard can create movement that doesn’t reflect how the table behaves in ordinary use.
From time to time, look over accessible fixings for visible looseness and check that feet and pads remain in place. If a fastener appears loose, follow the cautious approach already described rather than tightening everything as a precaution. A wobble that returns after a simple adjustment is a reason to reassess, not to keep adding fixes.
When adjustment is not the right next step
Persistent movement, split timber or a joint that opens calls for a pause in DIY work. Don’t keep using a table if its base feels unstable under light, ordinary pressure. Don’t try to disguise a structural concern with extra tightening or a stack of shims. Stop experimenting rather than using glue, drilling or dismantling the frame.
If you’re considering a different table, The Mensa Table Company makes solid-wood dining tables to order from 100% solid wood, including ash, walnut, oak and Swedish pine. The heavy-duty steel legs are engineered to support up to 200 kg. That capacity describes the legs’ support, not a guarantee that a table can’t wobble: floor contact, fixings and the frame still matter.
The company also makes matching benches, coffee tables, breakfast bars and desks. Custom sizes, finishes and leg styles are available on request, so you can consider how a table will fit your room and how you plan to use it.
Choose a Table for the Life Around It
Knowing how to adjust a wobbly handmade table can help you make more informed choices about a future piece: consider how it will be used, where it will stand and how its base meets the floor. The Mensa Table Company makes made-to-order tables from 100% solid wood, with heavy-duty steel legs engineered to support up to 200 kg. These details describe the materials and leg capacity, not a promise that a table can never wobble. Placement and floor contact still matter.
When choosing a size, use the room and seating needs as a guide. Tables measuring 120-140 cm seat 4, 160-180 cm seat 6, and 200-240 cm seat 8-10. Allow at least 90 cm of clearance around the table. If you’re planning a handmade table purchase, contact The Mensa Table Company to discuss your table requirements.
Frequently Asked Questions
Is it safe to use a table that wobbles slightly?
A slight wobble doesn’t necessarily mean the table is about to fail, but it can make cups, plates and other objects less secure. Keep the surface lightly loaded while you investigate, and don’t lean on the edge. If the base shifts noticeably, a joint opens or the wood looks cracked, stop using the table until the cause has been assessed. A shim can reduce rocking, but it doesn’t prove a structural issue is resolved.
Can a wobbly table damage the floor?
Repeated rocking can scuff some floor finishes, particularly if a foot or pad rubs against the surface. Before repositioning the table, check the feet for grit, damaged pads or a missing section that could scratch as it moves. Lift the table rather than dragging it. A clean, suitable pad may help protect the floor, but it shouldn’t be used to hide a loose joint or unstable base.
Should I use a power drill to tighten a table fixing?
A hand tool is usually easier to control for a small adjustment. A drill can apply force quickly, which may overtighten the fixing or damage the surrounding material before you notice. If you’re deciding how to adjust a wobbly handmade table, only tighten a fastener that’s accessible and clearly loose, and stop when it feels secure. If it spins freely, resists or shifts the joint, don’t force it or enlarge the hole.
Can humidity affect a solid-wood table over time?
Changes in a room’s conditions can affect how solid wood behaves over time. Avoid placing a table directly beside a strong heat source or in persistently damp conditions, and aim to keep its surroundings reasonably consistent. If the wobble appears alongside a crack, separation or a joint that seems to change, don’t assume humidity is the only explanation. Treat those signs as reasons to pause rather than making a quick adjustment.
Are felt pads a good idea under dining-table legs?
Felt pads can help reduce scratching as a table moves across a suitable floor, provided they’re clean, secure and in good condition. Check them occasionally, especially after moving the table: one worn or missing pad can change how a foot sits. Choose pads suited to the floor surface. They’re for protecting contact points, not for disguising a damaged leg, loose fixing or unstable base.
How can I tell whether a table is stable after adjusting it?
After an adjustment, check that the feet remain in contact with the floor and that the base doesn’t shift separately from the tabletop under light, everyday pressure. Don’t climb on the table, lean heavily on it or use a large load as a test. Pay attention to whether the original movement returns during normal use. If it does, or you can see damage, stop using the table and avoid further DIY changes.

Leave a Reply